The right mower for my grass - SUV or sports car?

When it comes to cars, there are SUVs and sports cars. With modern SUVs, you can also drive fast on the road, whereas a sports car is completely useless off-road. The situation is similar when comparing lawn mowers with high grass or meadow mowers. An advantage in one specific application can become a significant disadvantage elsewhere. Together with our expert Roman Mühleck from the product management at AS-Motor, we are today looking into the question for which application you need a high grass or meadow mower or whether a lawn mower is sufficient for the grass to be mowed.

The lawn mower - The clean cut counts

A classic lawn mower should be able to cut grass up to a length of approx. 20 cm and throw it into a catch bag without leaving any residue. To ensure that it masters this task cleanly, the directly driven blade has a high speed and thus a high cutting speed. The idle speed is around 2800 to 3000 revolutions per minute. Fast blades produce a clean cut surface on the blade of grass, which in turn turns less white, is less frayed and thus produces an attractive cutting pattern. At the same time, the blades of a lawn mower must generate a strong wind current so that the grass is sucked upwards, cut and then flung into the catch bag without residue. “This wind current, by the way, consumes most of the engine power, more than the mowing itself. At the same time, it is also this wind current that makes the typical hum of a lawn mower,” Roman Mühleck explains and adds: “This whole process takes place in a closed mowing deck, without a front opening for the grass, but only with an opening for the rear discharge. That is the secret of a clean lawn cut.”

Our expert: Roman Mühleck, Product Manager at AS-Motor.

When the power runs out

However, if the grass gets higher than 20 cm, a lawn mower will have problems dealing with it. First, all the grass in front of the mower has to squeeze under the mower bonnet. The resistance is felt when a lawnmower stops in tall grass and you have to push it forward with force. Now the long grass finally gets into the mower bonnet. But it is now pushed over and flattened. In addition, a lot of material gets into the bonnet at the same time. The engine starts to struggle and its speed drops. As a result, it can suck worse, cut worse and eject worse. The result is an unclean cut, standing stalks, unclean collection and finally a clogged mower bonnet – the engine goes out! It’s a similar story with mulching lawnmowers. “This is when our high grass mowers from AS-Motor come into play,” the expert knows.

With a classic lawn mower, the most important thing is a clean cut. clean cut, as achieved with the AS 510 EProClip.
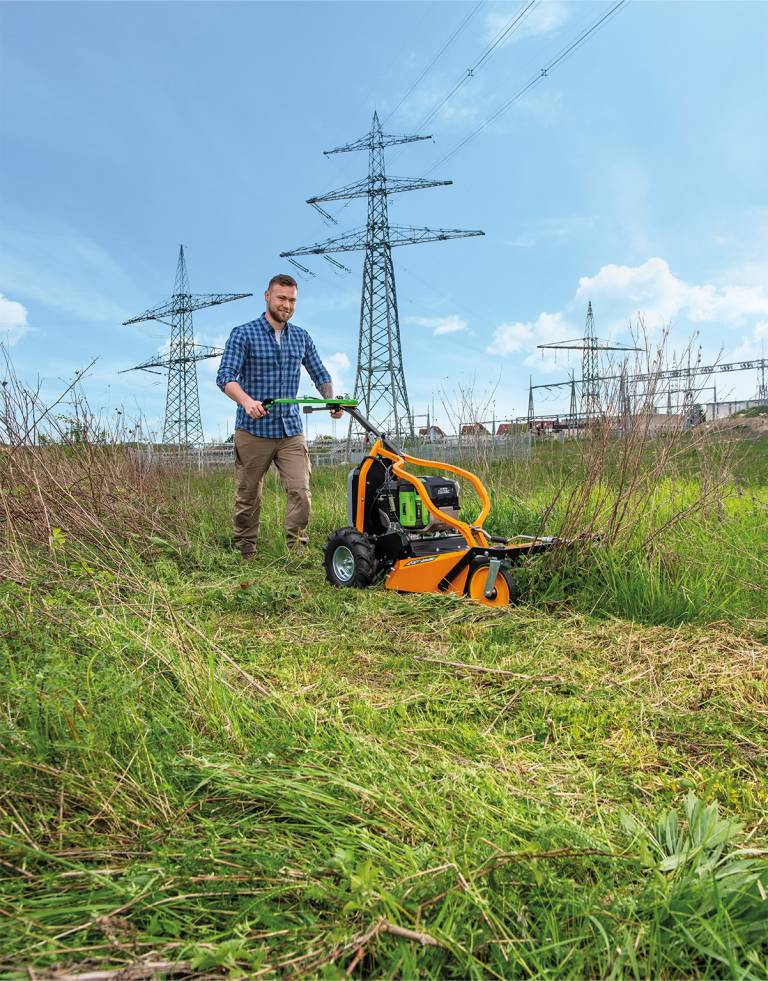
Grass heights of up to 100 cm and sloping terrain are no problem for the AS 63 EAllmäher.

The stronger ones: Meadow and tall grass mowers

Depending on the model, meadow mowers, high grass mowers or Allmäher can cut grass from 60 to 150 cm high. Above a certain thickness, they are also called scrub mowers. The biggest difference to a lawn mower is first of all the engine power of at least 5 hp or more. The mowing deck of these machines has a large opening to the front and allows long grass to reach the blades with little resistance without pushing it down completely. The stalks close to the ground can thus still be cut off by the blade at a right angle. Result: All grass is mown, few to no stems remain. In dense grass, however, the engine would soon reach its performance limit. The expert explains how this can be remedied: “Here we use a physical trick, an engine-blade reduction. The engine rotates at an idle speed of about 3400 to 3800 revolutions per minute. The speed is transmitted to the knife via a belt. By placing a larger pulley on the knife than on the motor, the speed of the knife is reduced, but the torque (power) on the knife is increased. Now the engine can cut dense and long grass because its power is multiplied. “At the same time, this separation of the blade and the motor by a belt protects the motor from damage if the blade hits a hard obstacle. The impact on the blade is absorbed by the belt and not transferred to the crankshaft. All models with a blade clutch, such as the AS 63 Allmäher, have this advantage.

The mown vegetation is discharged through enlarged discharge openings to the side or, in the case of closed mowing decks, to the rear between the wheels. Closed mowing decks with rear discharge, such as on the AS 62, AS 63, AS 65 and AS 73 Allmäher from AS-Motor, have a safety advantage, as the risk of falling rocks is reduced even further. In addition, they keep the clippings in the mowing deck longer, allowing them to be finely chopped (mulched). Models with a cross-blade system or flail mowers achieve the best mulching results here. Generally, tall grass mowers also have a stronger wheel drive than lawn mowers, as they also need to make progress on uneven terrain. Treaded wheels or pneumatic tyres with cleat tread are standard here. Models for use on slopes also have a brake, a parking brake or an engine brake as well as a differential lock and a laterally adjustable handlebar.

Not suitable for the English garden

Meadow and tall grass mowers are designed to cope with denser vegetation. Smaller models such as the Allmäher AS 21 can cut up to 60 cm of grass, large machines up to 150 cm. However, as explained above, the blade speed and the suction effect of the blade is reduced compared to a lawn mower. This means that cut surfaces are not as accurate and clean and any overturned or fine grass is not sucked up. In tall vegetation this disadvantage is little to not noticeable, but on a lawn it is. The cutting pattern on lawns is clearly worse. In addition, high grass mowers do not have a catch bag and the cuttings always remain visible on the surface. A real mulching lawn mower like the AS 510 ProClip is therefore the better choice here.

A professional lawn mower like the AS 531 can also cleanly mow grass up to 30 centimetres high.

Deciding on the right mower

Back to the comparison at the beginning. Meadow and tall grass mowers stand for the SUV and lawn mowers for the sports car. “The comparison only fits to a limited extent, because high grass mowers are not lawn mowers. They do not manage to create the same aesthetics on a lawn and, in addition, leave everything where it grew,” Roman Mühleck clarifies. Nevertheless, some models of high grass mowers with an additional mulching kit or two blade speeds can achieve quite useful mowing results on lawns – perhaps not in an English garden but certainly on a holiday property. On the other hand, lawn mowers definitely reach their limits with tall grass over 30 cm. Only powerful professional lawn mowers such as the AS 531 with at least 180 cm³ engine capacity and a 4-stroke or 2-stroke engine can still do something here.

So now it’s up to you to choose the right mower for your requirements. Many machines can be inspected and tested directly at the dealer. With larger machines, you should definitely mow once yourself, preferably on your own terrain.
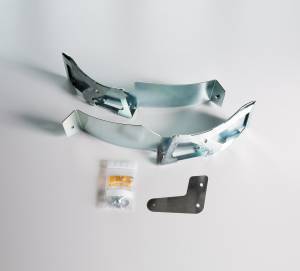
The additionally available mulching kit for the AS 62 and AS 63 provides a more attractive cutting pattern.

Preparing mowing and mulching equipment for spring

When the grass starts to grow, it’s a good idea to have your lawn or mulching mower checked and ready for use well in advance. Because before it goes from the winter rest on the meadow, an intensive look at the mower is worthwhile. The professionals from AS-Motor give an overview of what should be part of a check-up. Smaller maintenance work can be done easily by yourself.

Regardless of the spring check, the following applies: The operating instructions should definitely be consulted. For example, there are devices that should only be tilted to the right or only to the left. In principle, the air filter should always point upwards when tilting. If you do not follow this rule, you risk flooding the air filter with engine oil. It also states who can or should perform which task, because: Anyone can inspect mowing and mulching equipment; repairs and some other activities, especially on safety-relevant parts, should definitely be left to the specialist dealer or motorist. And since safety is comes first, the following applies before getting started: first disconnect the spark plug cap.

Complete check

Are there any bent or damaged parts? Is there any corrosion? Are all cables and wires still tight? Are there any cracks, breaks or signs of wear? Are the Bowden cables adjusted correctly? Moving cables such as shift or brake cables should be checked for corrosion and cracks, including individual strands. Moving parts must be lubricated regularly and according to instructions. If damage or defects are noticed during inspection, it is recommended to go to a specialist dealer.

Wheels and blades

During the month-long winter break, air-filled tires lose some of their pressure. Therefore, before mowing for the first time, they should be inflated to the recommended air pressure, if necessary. Wheels, like all moving parts, should be lubricated at the wheel hub. Blades must be tightly seated and free of damage, e.g., deformation, chipping, wear beyond the wear indicators, worn or pitted blades. If they are blunt or damaged, for safety reasons the rule is: Hands off. The specialist dealer not only repairs or sharpens the blades, he also has the necessary equipment for balancing them.

Refueling

Before refueling, check whether there is any fuel left in the tank from the previous season. If there is still some fuel left in the tank, it should first be completely emptied, including the carburetor. This is because old fuel can gum up and clog the carburetor and fuel lines. To empty the carburetor completely, start the engine, turn off the fuel tap, and let it idle until the unit shuts off on its own.

Now add fresh, new fuel. Normal gasoline fuel ages already after 30 days. Special additives can extend the shelf life over the winter. Gasoline and especially 2-stroke mixtures should not be older than three months. Otherwise, there is a risk of power loss or even engine damage in the case of 2-stroke engines. Commercially available special fuels generally have a longer shelf life.

Checking regularly - and early in spring

Regular checks help maintain a mower’s performance over time. High-performance and high-grass mowers in particular can run for many or even hundreds of hours in a mowing season, and almost always under full load. Accordingly, they require even more careful maintenance and inspection than smaller mowers with less operating time. For those who want to have the check done by the dealer, AS-Motor recommends making an appointment early so that the mower is ready for use in time for the mowing season. A nationwide network of qualified dealers can be found via the dealer locator on the AS-Motor website: https://www.as-motor.com/company/service/dealer-search/

Checklist before the first start-up:

  • Spark plug connector plugged in
  • Tire pressure adjusted
  • Fuel filled up
  • Moving parts lubricated
  • Complete unit visually inspected for damage or defects

Expert knowledge on all aspects of maintenance and service

Detailed instructions for cleaning and maintenance of body, frame and mower deck – Fit for the coming season Part 1

Detailed instructions for cleaning and maintenance of engine and electrical system – Fit for the coming season Part 2


Winter storage: How to prevent the engine from stuttering in the spring

Many power tools with petrol engines are pure seasonal workers. Work starts in March, summer is the daily peak season and October marks the beginning of the annual winter rest. Mothballed, the machines are then ideally freshly washed, cleaned and preserved. Despite all this care, it is often the case that the engine has starting problems or an annoying stutter in the spring – even though the machine was running excellently before the winter rest. What is to blame? Roman Mühleck, Product Manager at AS-Motor knows what to look out for in terms of fuel during storage to ensure a smooth start in the spring.

After preparing the machine for hibernation, the first question to ask is where and how to store it over the winter. The expert from the high grass mower specialists recommends a storage place that is dry and not too warm. It is also important that the place is level so that the machine can stand as horizontally as possible.  With two- and three-wheeled devices, it should be ensured that they cannot tip over so that oil and fuel do not leak out.

Our expert: Roman Mühleck, Product Manager at AS-Motor

Store with a full tank

Ideally, the tank should be completely filled before storage so that as little air and thus humidity as possible remains in the tank. Depending on the outside temperature, the air humidity can condense into water and settle in the tank, which can have a negative effect on the engine start in the spring during initial operation. This is often the fault of a white, sticky substance in the carburetor and fuel filter that forms from the condensation and evaporation of fuel over the winter months. Deposits can also be caused by corrosion.

The standard road fuels comply with the currently valid standards DIN EN 228 for petrol and DIN EN 590 for diesel fuel. They are designed for a typical storage time in the storage tank at the filling station of three to six months under ideal conditions. With an average wintering period of around five months with strong temperature fluctuations in the equipment shed, this minimum shelf life is quickly exceeded.

Through his many years of experience, Roman Mühleck knows that starting problems in the spring occur particularly frequently when using the standard fuel E10.  The reason for this is the increased ethanol content of this fuel type in conjunction with less than ideal storage conditions and a long retention time in the tank. Since ethanol is hydrophilic, i.e. it loves water, E10 absorbs atmospheric moisture better and the water content in the fuel increases. For regular operation in summer this plays only a minor role, but for the winter break this fuel is therefore only suitable to a limited extent. In principle, it should be clarified in advance whether the engine manufacturer has generally approved operation with E10.

The storage place for the winter rest should be dry and not too warm

The right fuel

For a good start of the season without stuttering, the AS-Motor expert recommends the following fuels for the last tank filling before the winter break:

  • Gasoline for appliances (alkylate gasoline): Gasoline for appliances is a special fuel which, due to its chemical composition, is particularly stable to oxidation, i.e. stable to ageing. This fuel is used by various engine manufacturers and vehicle manufacturers as an initial filling fuel in order to bridge any longer storage times that may occur before initial commissioning by the end user.
  • Premium fuel (e.g. 99-102 octane) from brand manufacturers: These fuels are equipped with special additive technology that cleans and protects the engine at the same time. This ensures better performance compared to standard fuels. Many users report that they have no starting problems when restarting seasonal vehicles, such as mulching lawn mowers.
  • Standard fuels E5 from brand manufacturers are often also equipped with additive technology. Here, too, there is a protection of the fuel system. Therefore, this fuel is also suitable for the winter break under ideal storage conditions.

The right fuel for the last filling before the winter break is one of the decisive factors for a good start to the new season.

Oil change before winter rest

The fuel properties mentioned also apply to the 2-stroke mixtures mixed from them. Many piston seizures of 2-stroke equipment happen during the first use in spring due to old, demixed oil/fuel mixtures. “Please always use fully synthetic 2T oils for the mixture or ready-made 2T alkalytic mixtures,” is therefore the expert’s urgent appeal. Outdated, mineral 2T oils have had their day.

In order to take full advantage of the recommended fuels during winter storage, the last refuelling should be carried out with an empty tank and the tank completely filled. Since used oil contains acidic ageing residues that can lead to deposits or corrosion over the service life, it is advisable to also change the oil before the winter break. Afterwards, the engine should be restarted so that the oil comes up to operating temperature. This activates the protective additives and the engine can be shut down for the winter. A new oil change in the spring is then no longer necessary.

Fit into hibernation - Fit for the coming season - Part 2

In autumn, lawnmowers, ride-on mowers and countless other garden tools can shift down a gear. Most of the work is done and there is more time to take care of maintenance, repairs and servicing.

The second part of our Winter Check-up series focuses on the engine, the electrical system and tyres. We asked the engine expert Wolfgang Gerlach from AS-Motor what needs to be considered.

Wellness for the engine

The good news for all owners of electric or battery mowers is that electric motors are normally maintenance-free. Only occasionally do air filters need be cleaned.

In the case of internal combustion engines, on the other hand, a number of points need to be worked through. We start with the air filter. This is removed and then checked for impurities. Dry dust, plant seeds and foreign objects can be removed by light tapping. Damaged, heavily soiled, or oil- and petrol-contaminated filters must be replaced. Our AS-Motor expert points out that when replacing a filter, you should always use original parts from the manufacturer. You can recognize AS-Motor filters, for example, from the logo on the filter. Unfortunately, there are many inferior copies available at the moment. Engine damage caused by copied filters is becoming more and more common. In addition, the dryness of the last few years has considerably increased the motors’ dust load. Therefore, it is advised to shorten one’s interval of inspecting air filters during the current season.

If the machine’s engine has run properly before the winter break, there is no need to unscrew and clean the spark plug. In this case, one must only be attentive to malfunctions and the engine manufacturer’s next prescribed service interval.

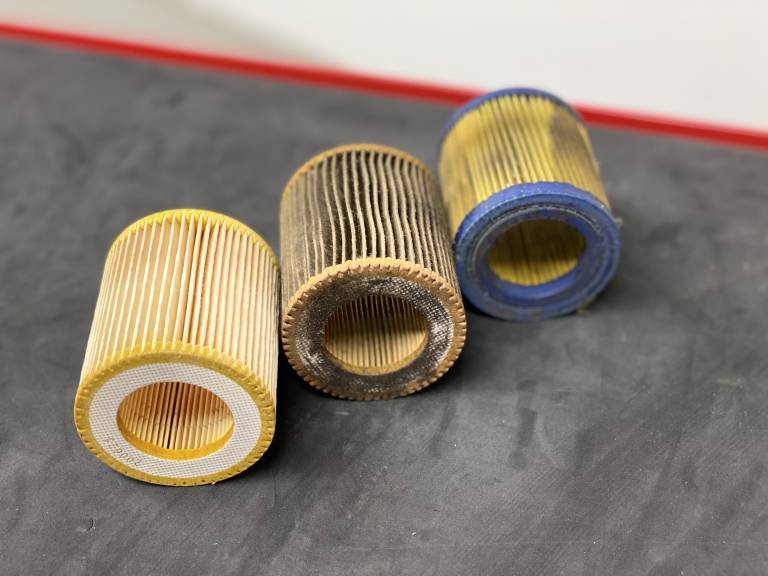
Engine damage caused by inferior copies is unfortunately not uncommon. The picture shows a new original air filter, a dirty original air filter and a cheap copy (from left)

Empty carburettor and tank

You must clean the carburettor carefully from the outside. Make sure that you do not damage any tension springs or loosen any screws. For 4-stroke engines the carburettor should also emptied before storage. To do this, close the fuel tap, start the engine and allow it to drain by letting the engine run until it stops by itself. There will still fuel left in the fuel filter and the fuel line, but the carburettor will be almost completely empty. Some carburettors also have a drain plug for the remaining fuel. Use this, if available.

Try to empty the petrol tank as much as possible during the last mowing. In the spring, fill up with fresh fuel. Machines with metal tanks are better equipped to avoid corrosion and condensation.

For machines with 2-stroke engines (except chainsaws and brush-cutters) the carburettor must also be emptied for storage. Proceed here as with a 4-stroke engine. It is also advisable to empty the fuel tank afterwards, as the 2-stroke mixture could segregate over the winter and cause engine damage in spring. Leave the fuel tank ventilation open. However, the fuel tap should remain closed. Otherwise the tank could dent or expand due to temperature differences. Basically, the following applies to 2-stroke mixtures: Only use fully synthetic 2-stroke oils. Mineral oils have become obsolete.

Our engine expert also points out that the oil in the fuel mixture of 2-stroke engines may stick to the fuel filter during the winter period and recommends: “Buy your 2-stroke mower a new fuel filter in the spring. This costs little and prevents starting problems and uneven engine running.”

Winterise batteries properly

Regarding the electrical system, one should first visually inspect the cables, the wiring harness, the plugs, the covers and the cable fastenings.

Please note the following in regards to the batteries. Maintenance-free wet and gel batteries are used in ride-on mowers today. Maintenance-free means that no acid or water needs to be refilled. It does not mean, however, that the battery does not need to be regularly charged when not in use and thus maintained. Once a battery is deeply discharged, it will suffer permanent damage. Therefore, if there is a risk of frost during storage, it is recommended that the battery be removed and stored in a dry place at 15 to 18° Celsius. The same applies to Li-Ion batteries. The batteries of ride-on mowers should also be charged at least once a month. So-called continuous maintenance chargers with intelligent electronics are particularly helpful for this. These are already available for around 20 euros in car accessory shops. Li-Ion batteries should be stored with a charge level of about 50 percent. In principle, batteries must be stored in a fireproof place, e.g. in a steel cabinet or metal box. Damaged Li-Ion batteries in particular pose an increased fire risk.

Clean cooling and sufficient oil

The petrol engines of ride-on mowers and combustion lawnmowers are usually air-cooled. The cooling air intake’s ventilation grid must be cleaned during the winter check-up. Also check, if possible, that the cooling fins of the engine are clean and the air baffles intact. However, cleaning and full inspection can only be carried out by a specialist dealer, as the cooling system is fitted with motor covers. Remember that dirty cooling fins can cause the motor to overheat.

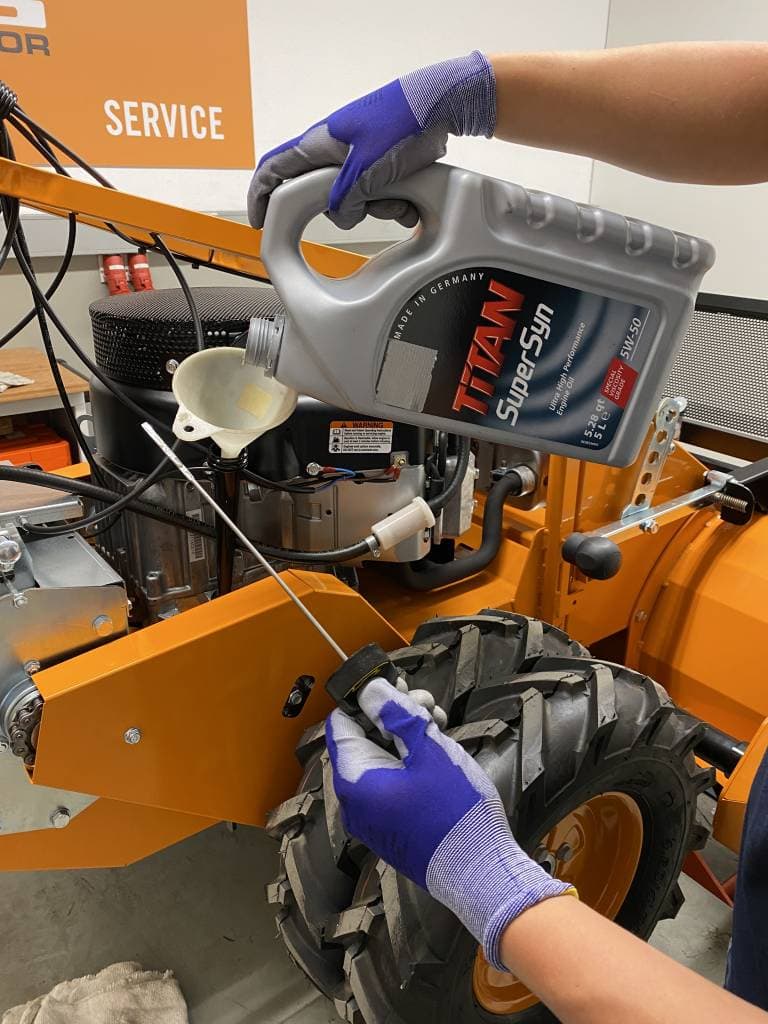
For 4-stroke engines, check the oil level with the dipstick. If there is any oil missing, top up with the required amount up to the maximum mark. Make sure to observe the oil change and oil filter service intervals for the engine, the hydrostat and if necessary, the gearbox. This check is not necessary for 2-stroke engines as they do not contain engine oil.

For 4-stroke engines the oil level must be checked and, if necessary, missing oil topped up.

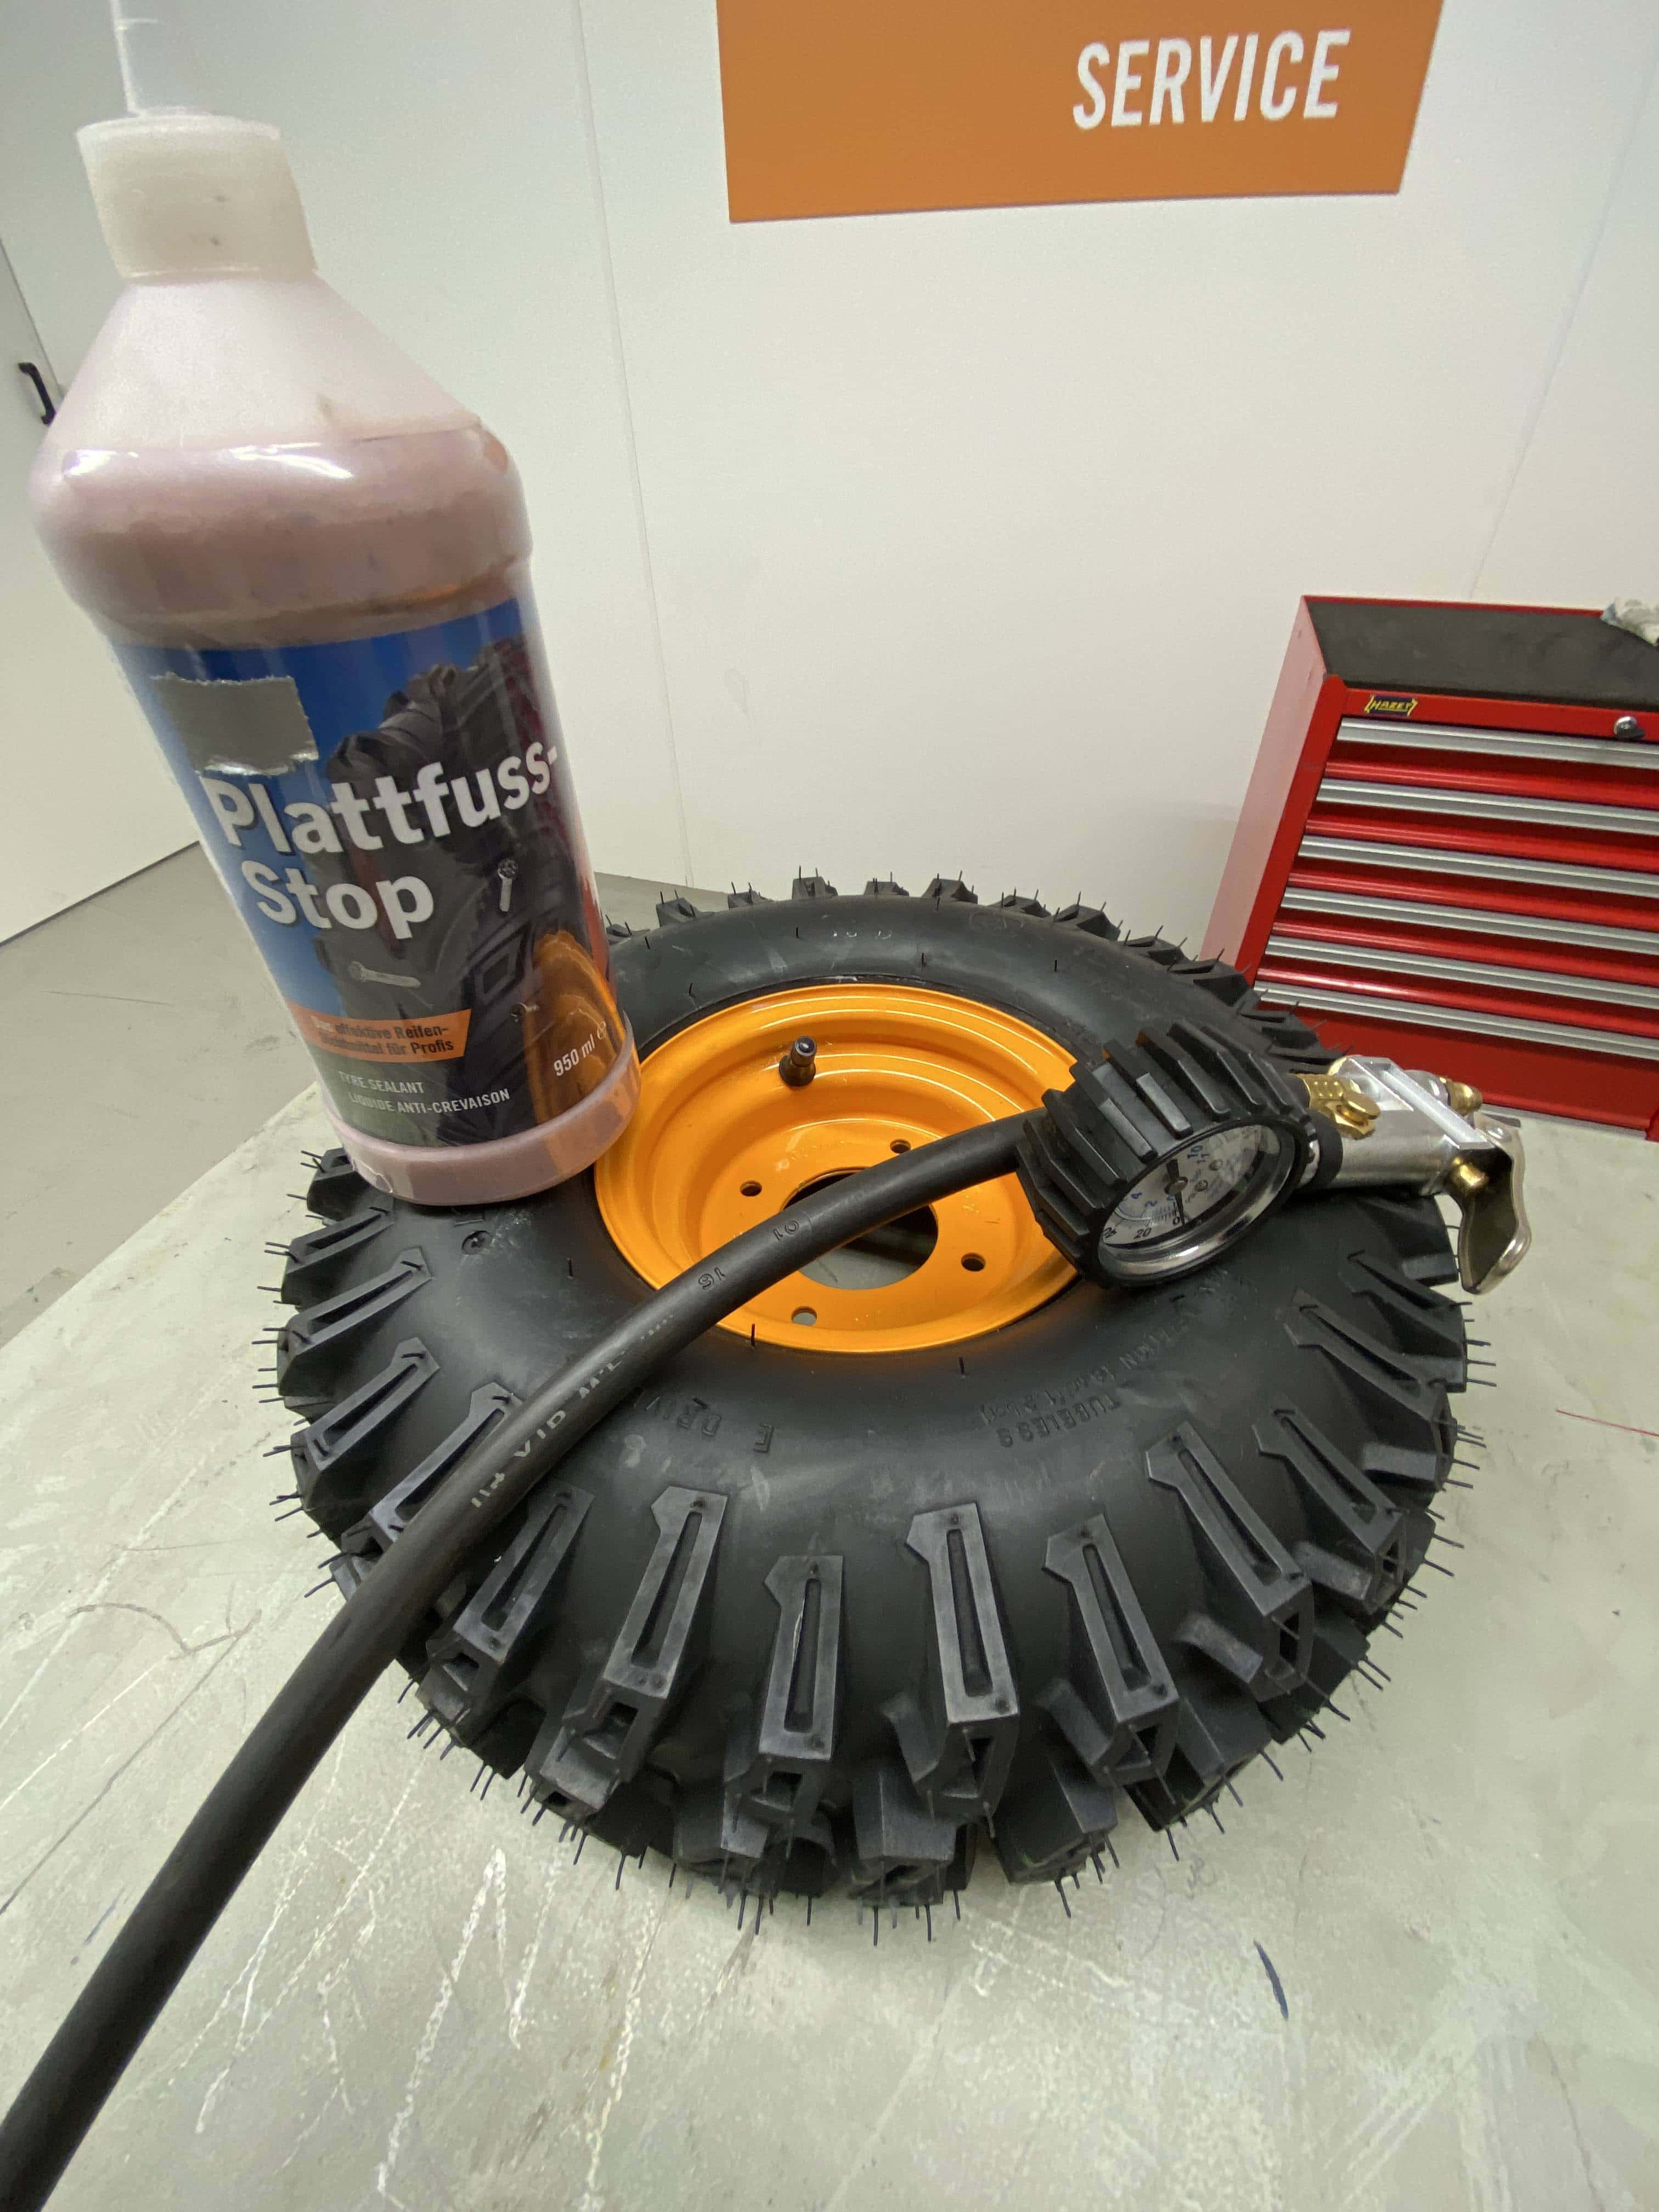
It is worthwhile to fill in a tyre sealant, especially for tubeless tyres. Downtimes are thus significantly reduced

The right pressure in the tyre

Ride-on mowers and garden tools travel at low speeds. It is not necessary to jack up the machines to avoid standing dents on the tyres. A few maintenance and control measures do make sense, however. Inflate the tyres to slightly higher operating pressure. Then the tyres should be checked for cracks, cuts, porosity, spikes and dents. You should also check whether any foreign bodies are between the rim flange and the tyre, and whether the wheel bolts are tight. In the case of tubular tyres, it is also necessary to check whether the valve is straight or has shifted. If necessary, the air must be deflated and the casing aligned, otherwise there is a risk of the valve shearing off.

As with every tyre, but especially with tubeless tyres, it is worth considering a tyre sealant. This greatly reduces downtimes as tyres can function even with many thorns stuck in the tyre. Tyres with sealant can lose some of their pressure if left standing for a long time. This is normal, as the sealant is distributed and can only work to its full effect when the tyre is driven regularly. Simply inflate these tyres again in spring and drive a few metres. Shortly before the start of the season, check again whether all tyres are still inflated or whether there are any “sneakers”. In this way you can avoid a negative experience at the beginning of the new season.

The new season can come!

Now your machines are ready for hibernation. They should be ready for use immediately at the start of the coming mowing season, without any annoying surprises, provided that you have written down any defects discovered during the check-up and had them corrected or repaired. Take advantage of the quieter winter months at your specialist dealer to have necessary repairs carried out in peace. Please always entrust work on blades and safety components to a specialist. We wish you happy working and good mowing in the next season.

Fit into hibernation - Fit for the coming season - Part 1

The ideal time for a comprehensive equipment check of lawnmowers, ride-on mowers and other motorised gardening aids is when preparing the machines for winter. Hardly anyone knows what to take into account for this process better than Wolfgang Gerlach. The trained mechanic has been working for 35 years at high grass mower manufacturer AS-Motor in Bühlertann.

In a small series, we have summarised the engine expert’s extensive knowledge of winter check-ups. In the first part, we first deal with basic things that need to be observed, and then dive into detail regarding the bodywork, frame and mower deck.

Benefits of the Winter Check-up

A comprehensive equipment check before storing machines for the winter kills three birds with one stone. Firstly, the machines are properly cleaned and permanently preserved; secondly, by checking the functions errors are detected. Thirdly, it shows where there is a need for action or repair by a specialist. The main aim is to ensure that the motorized helpers are functional and ready for use the following spring. Occupational safety is also an important factor here. Blades and flails are exposed to constant high stress and wear. At blade speeds of sometimes more than 200 km/h, everything must be in tip-top condition. The equipment check contributes to a machine’s extended service life and increased value retention.

Our engine expert: For 35 years Wolfgang Gerlach has been working at AS-Motor as a test mechanic in prototype construction and the engine test bench.

Before we get started

Every check-up begins with the necessary safety precautions. For example, the possibility of an accidental start of the machine must be eliminated before any action can be performed. For this reason, the main plugs must be disconnected on electric mowers. For battery-powered machines, remove the batteries and, if necessary, activate the off switch or remove the safety key. On motorized machines with a rope start, you must remove the spark plug connector. To be on the safe side with ride-on mowers, remove the ignition key and, if possible, disconnect the battery before starting work on the machine. Close fuel taps and tank ventilation. Basically, good ventilation must be ensured and the machine must be standing safely. Guarantee that no ignition sources are nearby and wear cut-resistant gloves.

Some safety precautions

Fresh shine and well lubricated

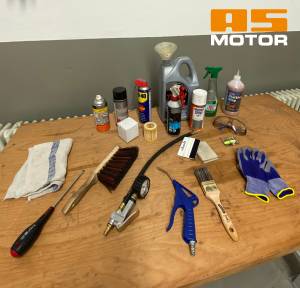
To clean the body and frame, first sweep away loose dirt, dust, leaves and branches with a hand brush. Stubborn dirt can be removed with a damp cloth and gentle cleaning agent. The expert from AS-Motor points out that decomposing, damp grass and leaves are particularly corrosive to metals and surfaces. Therefore, pay attention to rotten nests in corners and angles of your machine. The bodywork can be cleaned particularly gently and effectively with compressed air. We do not recommend the use of high-pressure cleaners, which degrease sensitive bearings and components. Cleaning additives are often particularly corrosive. Running water from the hose can be used instead. However, please also avoid sensitive and electrical parts and do not direct water jets at bearings.

Bowden cables and their outer shells can be checked while cleaning the bodywork. Chafe marks, kinks, bruises and broken strands impede correct functioning. Further damage can also result if, for example, a clutch does not disengage the transmission properly. For this reason, test the movement of the cables and the end fastenings. It is best to use a silicone lubricant to lubricate the Bowden cables. In contrast to oils and greases, silicone does not resinify, and less dirt sticks to it.

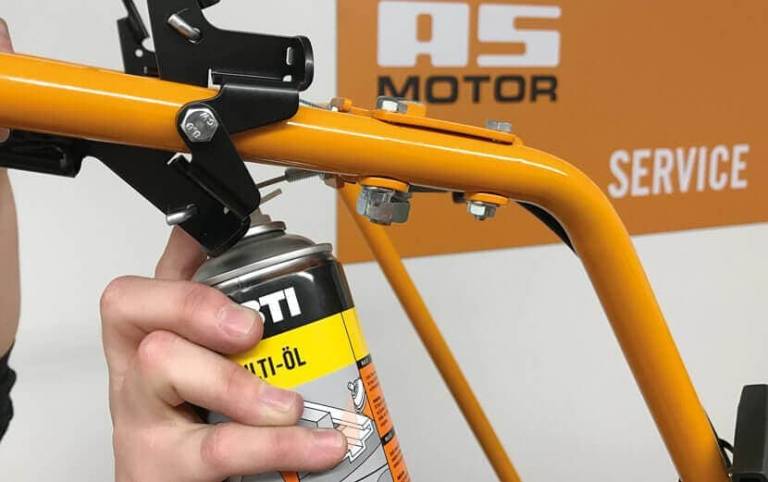
After cleaning, all joints, hinges and operating levers can now be lubricated with a resin-free multifunctional oil. Please note that no lubricant, oil or wax should get on drive or V-belts, pulleys, brake linings or dry clutches.

Everything you need for the winter check-up

Silicone spray is used for the Bowden cables, because it does not stick or resinify

Clean mower

For proper cleaning, mowers must be set up, folded over or tilted to the side. This is no problem with electric or battery-powered mowers, which can be placed on either side as they have no oil in the engine. For combustion engines, please proceed as follows: Close the fuel tap and the fuel tank vent. If the tank cap leaks, drain the fuel beforehand. After removing the air filter, the mower can be put on its side. Please note that on 4-stroke engines the air filter housing must always be on top when the mower is folded down, i.e. above the crankcase. Otherwise engine oil will run into the air filter housing and contaminate the intake duct and air filter.

Service stands can be used to safely tilt a ride-on mower. These are available from specialist dealers. Otherwise, the machine can be driven on ramps to make it accessible from below. Secure the ride-on mower so it does not roll away or fall over.

Now you can start cleaning the mower deck. Please pay attention to the sharp cutting tools. There is a risk of injury here. It is best to clean mowers and mowing bonnets immediately after the last use, as the grass residue adhering to them will still be damp. Use tools made of wood or plastic for scraping, so as not to unnecessarily damage coated surfaces.

Although the use of a high-pressure cleaner is not recommended, it can make work much easier when cleaning the mowing deck. However, in this case it is essential to observe the following instructions: Only use it to clean the metal or aluminium surfaces on the underside of the mower housing, and do not use any cleaning additives. Avoid the blade bearings, crankshaft and blade clutch when working with the pressure washer and maintain a nozzle distance of 20-30 cm. After a wet wash it is advantageous to run the machine for a short time. Water residues will fly off the moving parts or be displaced by the air stream.

In order to clean the mower, it must be turned over or titled to the side. Particular precautions is required for devices with combustion engines.

Are the blades still ok?

After cleaning, inspect the blades. Some questions must be answered: Are there any cracks, deformations or damages? Are the blades sharp or do they need to be sharpened? Has the wear of the blades already reached the minimum mark? Are the locking screws loose or worn? Are all safety guards or ejection guards intact?

If you discover any abnormalities during the inspection of the blade system and its protective covers, you must have a specialist workshop carry out any necessary repairs. Faulty blade systems pose a great danger to users and passers-by. Blade repairs may therefore only be carried out by a specialist. Even when simply resharpening blades and knives, it is necessary to check for imbalances afterwards. Without special tools, vibrations will permanently damage the machine.

Well protected through the cold season

After the cleaning and blade check, the mowing deck and blades are preserved from below and protected against winter corrosion. Use wax or oil-based care products for this. The AS-Motor Expert points out that no surface coating, whether paint, powder coating or galvanisation, will last permanently in a mowing deck. These surface coatings are no match for stirred up stones and sand, aggressive plant liquids and permanent moisture. Slight rust and corrosion are therefore normal. During regular operation, this plays an insignificant role in durability. Only long-term storage in a soiled condition will allow sheet steel to rust through. For this reason, the major annual cleaning should be carried out before the machine is left to winter.

The trend is towards high-grass mowing

Cultivated landscapes worldwide have changed significantly in recent decades. Due to structural changes in agriculture, many areas are used more intensively while in some cases peripheral areas are no longer being used at all.

This gives rise to the following trends:

  • Shrubbery/forest cover is increasing, resulting in the reduction of flora and fauna diversity in peripheral areas
  • A dramatic loss of species in intensively-maintained green areas

This merits the following countermeasures:

  • Keep peripheral areas (meadows, orchards, slopes, etc.) open via economically efficient mowing methods
  • Adapt mowing procedures in peripheral areas, i.e., reduce the number of mowings per year and push back the first mowing
  • Adjust the mowing time to accommodate insects and bees – early in the morning with overcast skies or late in the evening are best
  • Create rotational fallow land or leave old grass strips untouched

Rethinking the maintenance of green areas is necessary to protecting biodiversity. Thus high-grass mowing is more than just a trend: it represents a step to protect the environment and, above all, to reduce bee mortality.

Examples of AS-Motor device implementation for environmental protection and nature conservation:

Meadow orchards preserve our ecosystem by functioning as bee pastures, promoting biodiversity. It is thus important that mowing does not occur until flowering (end of June – middle of July). Following this guideline plants in the meadow can quickly grow to a height of 100 cm or higher, terrain ideally suited to AS-Motor’s Allmähers and ride-on mowers.

Cultivation of orchard meadows and other peripheral areas requires mowing only 1-2 times a year, to keep areas free of shrubs and bushes. In this time grass can grow 60-100 cm high, requiring outstanding mulching capabilities. AS-Motor devices have been engineered precisely for this purpose.

Other advantages of high-grass mowing with AS-Motor machines:

Reducing the number of mowings per year not only makes sense for environmental reasons, but also offers economic advantages by minimising time, personnel expenditure, and operating costs such as fuel and wear parts. Mulching and uniform cutting placement also eliminates the need for cost-intensive removal.

Naturally, extensive care with only 1-2 mowings per season also translates to significantly lower emissions in the form of exhaust gas and noise.

Keep mowing with thorns in the tyre - Puncture protection options for pneumatic tyres

The legendary flat tyre has been annoying drivers since 1887, the year John B. Dunlop invented the first air-filled tyre. Since then, everyone has been enjoying the air-filled tyre’s advantages: low weight, good traction, high speeds and, above all, high suspension comfort.

When using lawn tractors and ride-on mowers, it’s usually the small, nasty thorn that suddenly brings speedy mowing to an end – goodbye to your daily goal.

Small cause, but big effect: Lift the machine, remove the wheel, drive to the nearest dealer.

Once there, ask if he could fix it right away despite a full shop, wait 20 minutes, pay 20 to 30 euros for the repair and then quickly return to your work. Put the tyre back on and off you go. If all this together takes only one hour, you have been really lucky. You can guess what this downtime costs a service provider. So, hopefully nothing will happen for a while.

It’s good to hope, but if this happens two or three times a week, you’ll be looking for ways to protect yourself for cost reasons and to spare your nerves.

What options are available nowadays?

The first thing that comes to mind here are various puncture aids. These are products, mostly in the form of a spray can, which are carried in the car instead of the good old spare wheel and are available at every petrol station. In the case of a defective tyre, the agent is supposed to make the tyre drivable again by a chemical reaction and adhesive effect. Application is therefore not possible as a preventive measure but only in the case of an acute puncture. Almost always, this type of repair is not permanent, but only short-term. After repeated use, the tyre can even become unusable and must be replaced.

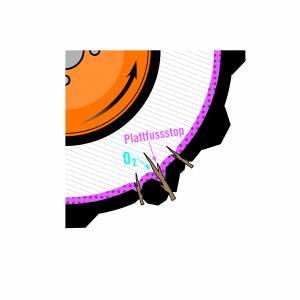
However, there are also permanent puncture protection products. These are filled into a tyre as a preventive measure, sealing the tyre immediately in the event of a puncture and thus enabling work to continue without downtime. Compared to short-term puncture aids products, these are able to permanently seal leaks and injuries and allow use of the tyre as usual. The way permanent puncture protection products work is simple but amazing. Either rubber particles or synthetic fibres of different sizes or lengths are added to a water-based, solvent-free fluid.

In the event of mechanical damage to the tyre, the tyre pressure presses the fibres or rubber particles into the puncture channel and blocks it mechanically and permanently. This functional principle is permanent and can be repeated as often as required. Only a small amount of air escapes until the puncture is closed by the puncture protection product. The special feature of this puncture protection is that thorns, nails or other sharp foreign bodies can get stuck in the tyre casing and still be sealed permanently.

One such puncture protection product is, for example, “Plattfuss-Stop” by the company AS-Motor in Bühlertann. At the Demopark 2019 trade fair, booth visitors were able to puncture a ride-on mower tyre with a pointed tool. After three days of trade fair and more than 200 holes, the tyre was still tight. AS-Motor became aware of the puncture protection agent at a fair in America. For a long time, many customers of the Swabian manufacturer of high grass mowers complained about frequent flat tyres.

An attempt to solve the problem by permanently foaming the tyres with polyurethane failed. Although permanent foaming prevents flat tyres 100%, it is accompanied by three major disadvantages: First, the weight. The weight of a front wheel (4.80/4.00-8) of the AS 940 Sherpa 4WD XL, diameter approx. 40 cm, width approx. 10 cm, increases by a 7 kg when foaming. If all four tyres of the machine were to be foamed, including the large rear wheels (20×10.00-8), the additional weight of the machine would be about 64 kg! Including the driver, this can exceed the maximum permissible total weight of the machine. Secondly, the high price. The foaming of an AS Sherpa front wheel costs about 70€ at a specialised company. Third, the completely missing suspension comfort afterwards. The driver and the machine will permanently suffer negative impacts. The handlebars, axle bearings and axle suspension will soon wear out and so will intervertebral discs of the driver.

After extensive tests of the puncture protection product “Plattfuss-Stop” and solid references at the US Army as well as the Royal Mail in Great Britain, AS-Motor decided to import the product and use it in its professional ride-on flail mower AS 1040 YAK 4WD. According to AS-Motor, YAK professional customers are very satisfied without exception. Therefore AS-Motor Customer Service recommends all customers with punctures to use “Plattfuss-Stop”. In tubeless tyres the permanent puncture protection can develop their maximum protection effect by more than 95%. Punctures are reduced considerably in tubular tyres as well, though unfortunately not as well as in tubeless tyres. It may prove beneficial to replace tubular tyres with tubeless tyres and then consistently use tyre puncture protection. In the case of tubular tyres on welded rims, it may be required to replace the casing and the valve. In the case of major damage to the tyre flank, however, even a good puncture protection product is powerless.

The old rumour – preventive tyre sealants stick everything together when changing tyres – is no longer the case. “Plattfuss-Stop”, for example, is water-soluble, easy to wash off, non-toxic, with an unlimited shelf life, and biodegradable. The price per litre according to AS-Motor is approx. 37,00€ incl. VAT. The customer can find specialized trade partners and filling quantities on AS-Motor’s website. For an AS 940 Sherpa 4WD, about 3 litres of “Plattfuss-Stop” are sufficient according to the manufacturer: 1 litre per rear wheel and 0,5 litre per front wheel. AS-Motor releases the product only for agricultural purposes, not for cars, motorcycles or similar.

Conclusion

The one-time investment in a puncture protection product when buying a new ride-on mower can be worthwhile – think of your wallet and your own nerves.

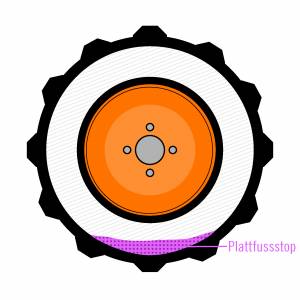
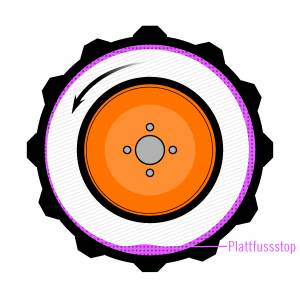
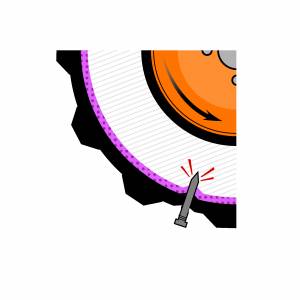
How the tire sealant AS-Motor Plattfuss-Stop works

1 Standstill

2 Drive

3 Foreign object penetration

4 Effect “Plattfuss-Stop”

5 Insertion of foreign object

6 Effect “Plattfuss-Stop” (with foreign object remaining)

Slope mowing: Experts from AS-Motor provide tips on different mowers

Mowing on slopes is demanding – depending on the machine, procedures vary in ways you should be aware of.

Hand-guided, in ride-on operation, or remote-controlled: What is the best way to work a slope? What features should a ride-on mower have for use on steep terrain? And why should the range of a remote-controlled mower not be fully utilised even on known areas? The experts at AS-Motor Germany GmbH & Co KG have put together a few practical tips that not only make work easier, but also ensure greater safety while mowing slopes.

Hand-guided mowers

After a certain incline, hand-guided devices should always work transverse to the slope. This is less strenuous for the operator than it is to guide the mower up and downhill. Turns should be executed uphill as the device can accelerate when facing downhill; in extreme cases the mower can even swing around. The user should not walk directly in the track of the mower; rather, the steeper the slope, the more the operator should support himself towards the slope by walking a little lower. Pivoting the handlebar slightly downhill – as when working along a fence or a building – significantly improves the ease of operation.

Ride-on mowers

Because the operator is situated on a ride-on mower, it must always be suitable for the slope. A low centre of gravity and special features such as all-wheel drive, differential lock, and/or special tyres ensure that the mower maintains traction even on steep inclines. Information regarding mower stability must always be known. The tipping threshold of a ride-on mower is defined as when steering is turned all the way in one direction; the device cannot overturn unless this stability value is exceeded. But differences exist even among similar models, as illustrated by the AS-Motor Sherpa family: the AS 915 Sherpa 2WD and AS 920 Sherpa 2WD have a stability of 18 degrees transverse to the slope, the AS 940 Sherpa 4WD has a stability of 20 degrees and the XL version and remote-controlled RC model have a stability of 21 degrees in ride-on mode. If the AS 940 Sherpa 4WD RC is operated remotely, stability is 33 degrees.

When terrain is steep, the operator’s sitting position becomes difficult to maintain when working across the slope. This is why ride-on mowers must move uphill and downhill on slopes. Operators should be careful to avoid uneven soil that can unintentionally cause the mower to lean at an extreme angle, particularly when turning.

However, since up and downhill movement in ride-on operation also places physical demands on the operator, it is particularly advantageous to have a ride-on mower that can be switched to remote-control operation in steep terrain.

Remote-controlled mowers

Remote-controlled devices enable mowing both transverse to the slope and up and downhill. Caution should be taken when driving on fresh cuttings which can reduce traction, thus risking mower slippage. When working crosswise to the slope, mowing should be done from top to bottom so that cut grass is deposited above the mower. Furthermore, it is important not to walk below or in front of the mower.

In the case of rotary mowers the right side should also be avoided, as the blades’ clockwise rotation accelerates cuttings and foreign objects to the right and right rear. Thus the safest position for the user is behind the machine on the left side. Remote-controlled mowers’ range should never be fully utilised, even when mowing well-known terrain. Here’s why: Only the operator who walks close to the mower is able to detect foreign objects in good time.

In addition to these tips, the operating manuals for the AS-Motor devices provide useful information. Operating manuals are mandatory reading for safe and proper use of the mower; should the details cited here deviate from the information in the operating manuals, the information in the operating manuals takes priority. This information can be accessed at www.as-motor.com. AS-Motor’s YouTube channel also provides product safety videos on various mowers: https://www.youtube.com/channel/UCLqXsENxtcHxyEQ4zUO147g.

Combating giant hogweed with AS-Motor’s remote-controlled ride-on mower AS 940 Sherpa 4WD RC

Controlling giant hogweed is a major challenge. Due to its rapid proliferation, the plant endangers native vegetation while skin contact with giant hogweed can cause photo-toxic reactions and thus severe skin burns. AS-Motor’s remote-controlled AS 940 Sherpa 4WD RC allows users to combat giant hogweed populations safely and efficiently.

Giant hogweed, a health hazard and an ecological threat

Giant hogweed’s various species (Heracleum mantegazzianum, Heracleum sosnowskyi, Heracleum persicum) originate in the Caucasus, Turkey, Iran and Iraq. Giant hogweed was introduced to Europe in the 19th century as an ornamental crop and has now spread over most of the continent. Giant hogweed stores nutrients in tap roots and forms flowers and seeds as soon as sufficient reserves are present. The single flowering, herbaceous plant usually blooms in its third to fifth year of life, which in Central Europe occurs between June and July. The plant’s numerous individual flowers form a cone with up to 50,000 highly germinating seeds, making the giant hogweed’s reproduction potential enormous. After flowering, the plant dies and its seeds are spread by wind, water and human beings. The seeds are ready to germinate after flowering in spring and remain germinable for up to 10 years.

While all parts of the plant are toxic, the clear, aqueous sap from inside the plant contains photo-sensitizing substances (furanocoumarins) that, in combination with UV radiation, can cause severe skin burns (phytophotodermatitis) in humans. Native vegetation suffers in biodiversity and biodensity from the giant hogweed as these plants are forced to compete for light and water with an herbaceous perennial that grows up to 4 meters high. Giant hogweed populations can also cause erosion damage in shore zones as their roots do not have a shore-stabilising function.

Remote-controlled mower for optimal user safety

Various control measures are used to combat giant hogweed and to prevent its further proliferation. Manual and mechanical measures include the use of herbicides and grazing, or cutting off the root and thus the vegetation cone, which causes the plant to die. Other control measures include removing the umbels, digging out the plant and mowing with a trimmer or lawn mower. In all the above, however, the user is in direct contact with the plant and therefore exposed to a high health risk.

AS-Motor offers a remote-controlled ride-on mower to safely combat giant hogweed populations. The AS 940 Sherpa 4WD RC can be conveniently and precisely operated from outside the danger area via a professional remote-control unit with a range of up to 300 meters. A low centre of gravity and optimal propulsion qualify the device for mulching on difficult and steep terrain. The AS 940 Sherpa 4WD RC offers additional user protection thanks to its closed mowing deck.

Combating large populations of giant hogweed

Digging out individual giant hogweed plants or cutting their roots is a time-intensive process, making mulching the most efficient measure for large populations. In the first year of control, cutting should occur shortly before flowering when the plant can be weakened the most. If the plant grows high, which is usually the case, it is advisable to first clear the plants at a high cutting level and then mow a second time on the level closest to the ground. After this first mowing, regular mulching during the entire vegetation period is necessary since the plant grows back. As the plant can bear blossoms and form seeds starting from a height of 10 cm, mowing is necessary approximately every ten days depending on the weather. From the second year of control onward, mowing should take place as early as possible in the growing season and be repeated regularly at intervals of approximately ten days. Mulching withdraws energy from the plant until it finally dies. Overall, it may be necessary to repeat this procedure for up to ten years. The area must be checked regularly to ensure that all plants are dead and that seeds are no longer germinable.

Combating small populations of giant hogweed


Control procedures may differ for smaller populations:

  • It is advisable to mulch the plant first
  • then cut the root 15 cm below the ground, with a spade for example
  • the surface should then be covered with a black tarp to suppress seed germination. Nevertheless, regular inspection of the area is required in order to control seedlings
  • Cleaning of the machine with appropriate protective clothing (see below)

Cleaning of the machine to protect the user

Appropriate protective clothing is essential even if the user operates the remote-controlled mower from a safe distance and is thus protected from direct contact and spraying of plant sap. In this case protective clothing means a full-body coverall with hood, protective goggles, rubber gloves and boots. This is especially important for the subsequent cleaning of the machine.

After each use, a thorough cleaning of the machine is necessary. The device should be loaded onto a transport vehicle via remote control. If a person comes into contact with sap on the machine, photo-toxic reactions can occur even some time after use. To clean the machine, it is recommended to apply vinegar cleaner (with not more than 10% acetic acid) while wearing protective clothing and to clean the machine using a strong water jet (not a high-pressure cleaner, particularly due to the increased risk of splashing) and a brush.

Safety is the top priority: Tips from AS-Motor experts for mowing on slopes

Mowing steep slopes is a demanding task for both man and machine. The experts of AS-Motor, a manufacturer of high grass mowing equipment, outline tips and basic rules that not only facilitate slope mowing but improve operator safety.

Mowers’ operating manuals are mandatory reading. They contain information regarding the safe and intended use of each device, and provide assistance for the fundamental decision as to whether a specific mower is suitable for use on certain types of terrain. When mowing slopes, for example, information concerning stability diagonal to the slope deserves special attention and should always be complied with. If the details cited here deviate from the information in the operating manual, the information in the operating manual always takes precedence.

Before we get started

Increased caution is required on steep slopes as there is danger of injury if the operator slips or the mower tips over. Downhill tasks are more difficult to master than uphill tasks – even if you can easily make it up the slope with your mower, things can become problematic on the way down.

Thus, the downhill path must be thought through from the outset. At certain gradients you should only work with mowers that have both propulsion and a brake. AS-Motor devices are equipped with a safety brake, meaning that release of the drive lever automatically activates the parking brake, bringing the mower to a standstill. Limited-slip differential is not a luxury but rather a considerable safety feature that limits the speed of downhill travel.

Tip 1: Check the mower and the terrain

Certain ground rules apply whether the area is steep or level: for example, a visual inspection should always take place before starting a mower. Check the blade, protective cloths or plates, drive and fastening parts, as well as cables and cable connections for faultless condition. Also check your work area for foreign objects before starting to mow. Remove rocks, sticks, wires and other objects that could be ejected from the mower deck. Holes, stones, roots, drainage ditches, etc. can cause imbalance or collision with the blades, especially if the mower is not equipped with a blade clutch. The operator must note these points and mow at an adequate distance from them.

Tip 2: Gradient and ground conditions

The gradient and ground conditions are important when mowing slopes. Today smart phone apps can easily determine the gradient – at a tip-over limit of 21 degrees, who can precisely assess whether the inclination is 19 or 23 degrees by eye? In any case, ride-on mowers should ideally be equipped with tilt meters.

Moreover, it is important to assess the ground condition when mowing slopes. Minimal ground cover and loose or wet soil increases the danger of slipping. If a mower starts to slip or tip over, immediately let go of the mower and do not attempt to stop it or keep hold of it. Injury should be avoided at all costs.

Tip 3: Mowing extreme slopes

Extreme slopes start at inclines of 40 degrees. Walking becomes difficult on these slopes, let alone mowing tasks. Certain accessories such as agricultural tread and/or twin tyres, spikes and steel wheels improve traction while oscillating crawler tracks that move in proportion to each other are particularly effective at maintaining ground contact on extreme slopes.

Operating manuals specify the engine manufacturer’s precise gradient limits. The lubricating film of 4-stroke engines can tear on extreme slopes, causing engine damage. This risk does not exist for 2-stroke engines which is why they are ideally suited for tasks on extreme slopes.

Tip 4: Refueling

A basic rule for mowing on a slope is: fill it up. If the mower does not have a fuel pump, petrol will no longer reach the engine at certain gradients which can lead to the engine stopping on its own. Tapered fuel tanks are better suited for inclined surfaces. When the level of liquid drops, petrol will no longer reach the fuel tap in tanks that are flat at the bottom. As a rule, AS-Motor devices are equipped with a fuel reserve which makes it possible to safely drive off the slope and refuel.

The mower must be on a level surface when refueling. Furthermore the engine must adequately cool down so that spilled fuel cannot spontaneously ignite. The operating manual specifies how long it takes for the engine to cool down. Since excess pressure can occur in the tank, the tank cap must be opened slowly and carefully. Mechanical brakes that work in the instance of engine failure are important safety features, especially for ride-on mowers.

A device’s operating manual contains a lot of worthwhile information beyond these tips. This information can be accessed at www.as-motor.com. In addition, you can watch Product Safety Videos on AS-Motor’s YouTube channel.